User Flow & Backoffice Flow
Add Fund - User Flow & Backoffice Flow
User Flow
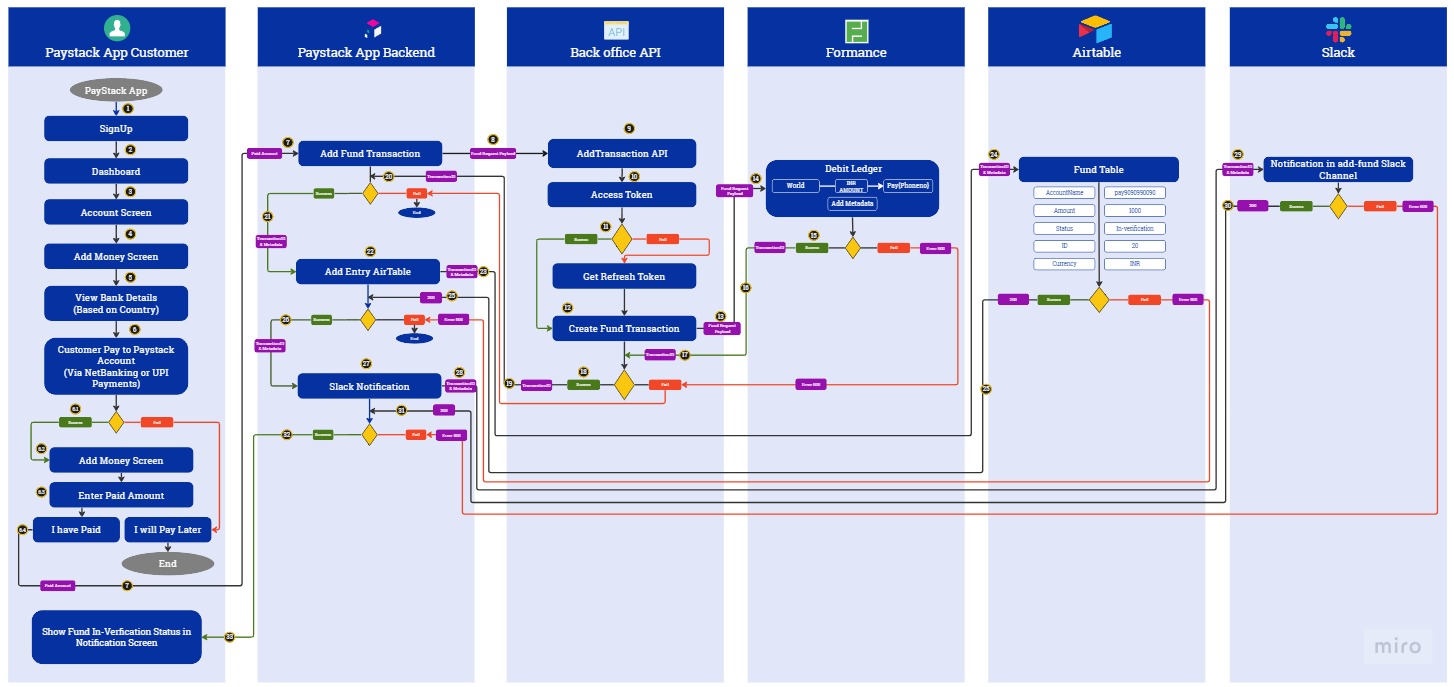
User Flow Diagram - Data
Fund Request Payload
{source: "world", destination: "pay3498984398", currency: "INR", ledger: "debit", amount: "324",...}
amount: "324"
currency: "INR"
destination: "pay3498984398"
ledger: "debit"
metadata: {fund_status: "requested"}
fund_status: "requested"
source: "world"
Formance Response
{
    "records": [
        {
            "id": "reclP8mVeL8DSkeo4",
            "createdTime": "2023-09-23T14:06:15.000Z",
            "fields": {
                "AccountName": "pay3498984398",
                "Amount": "324",
                "Status": "requested",
                "ID": 107,
                "Currency": "INR",
                "TransactionID": "157"
            }
        }
    ]
}
Slack Message for Fund added
Fund Added for account: pay9790841124
 paid_details:{fund_status: requested}
 Add Fund here: https://paystack-backoffice.vercel.app/add_fund/271
Step 1: Sign Up on Paystack Application
Begin by signing up on the Paystack Application if you are not already registered.
Step 2: Adding Funds
- Users can add money before and after adding a bill.
- Once the bill setup is completed and approved, users will see a warning in the dashboard indicating "Insufficient Funds, Add Money Now!"
Step 3: Paying a Bill
3.1 Add Funds Page
- In the "Add Fund" Page, users will find Paystack's account details for making payments.
- To pay a bill, for example, if the total bill amount is 1000 INR, the user should transfer 1000 INR to the Paystack account.
- Users can make this payment from various platforms such as UPI or Net Banking.
3.2 Confirm Payment
- After making the payment, the user needs to:
- Enter the amount paid in the "Enter Paid Amount" textbox.
- Confirm the payment by checking the provided checkbox.
- Select the "I have Paid" button to complete the process.
Step 4: Slack Notification
- From Airtable, receive Accountname, Amount, ID, status, and currency.
- Send the ID to Slack.
Step 5: Back Office Verification
- The Back Office receives a notification message on Slack.
- The Back Office verifies whether the correct amount has been received in the user's account.
Step 6: Back Office Transaction
- After verification, the Back Office creates a performance transaction with the respective amount received from the user.
Step 7: Slack Transaction Link
- After verification, go back to Slack and select the link to make a transaction on performance.
Step 8: Update Airtable
- In Airtable, update the Fund Table status as "verified."
Step 9: Hide Alert
- After funds have been successfully added, the "Insufficient Funds, Add Money Now!" warning will be removed from the Dashboard.
Step 10: Display Balance
- In the Account Screen, users can see their added fund amount. In Notification, user can view their fund status.
Backoffice Flow
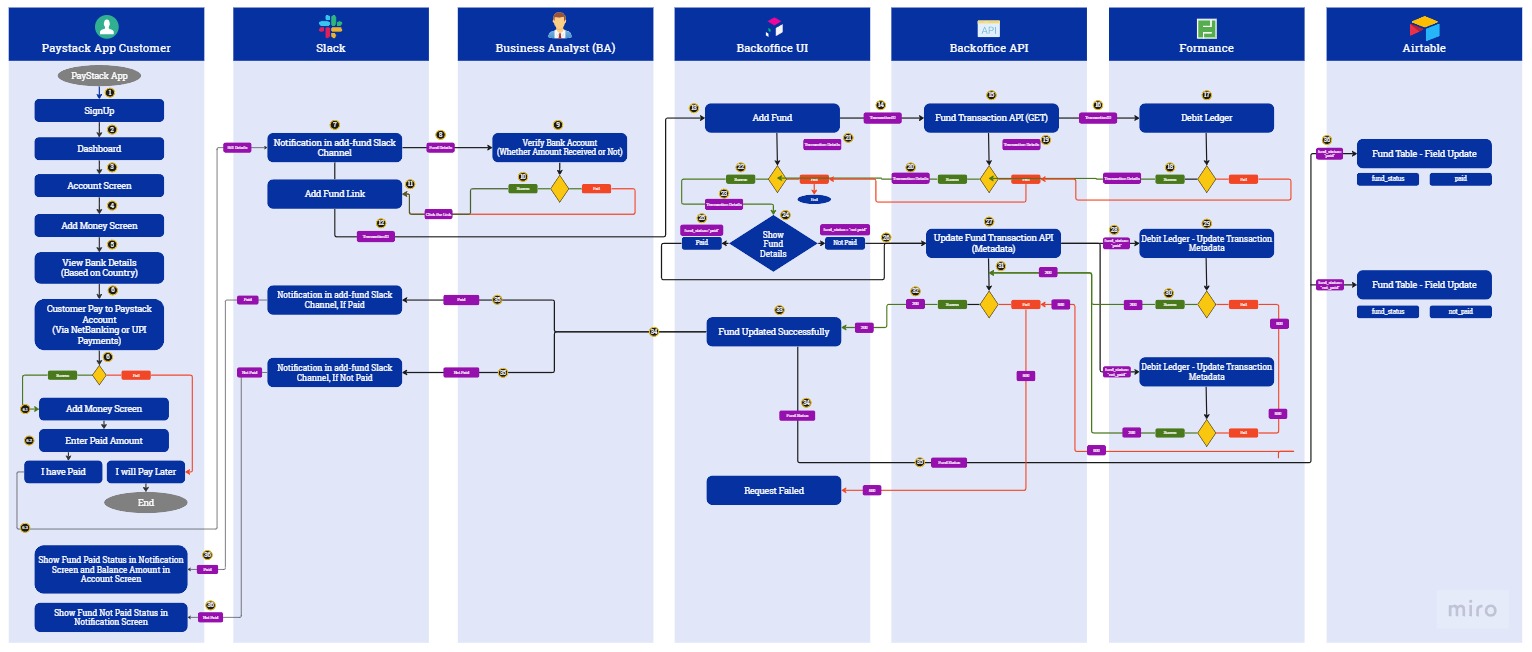
User Flow Diagram - Data
Fund Request Payload
{source: "world", destination: "pay3498984398", currency: "INR", ledger: "debit", amount: "324",...}
amount: "324"
currency: "INR"
destination: "pay3498984398"
ledger: "debit"
metadata: {fund_status: "requested"}
fund_status: "requested"
source: "world"
Formance Response
{
    "records": [
        {
            "id": "reclP8mVeL8DSkeo4",
            "createdTime": "2023-09-23T14:06:15.000Z",
            "fields": {
                "AccountName": "pay3498984398",
                "Amount": "324",
                "Status": "paid",
                "ID": 107,
                "Currency": "INR",
                "TransactionID": "157"
            }
        }
    ]
}
Slack Message for Fund added
Fund Added for account: pay9790841124
 paid_details:{fund_status: requested}
 Add Fund here: https://paystack-backoffice.vercel.app/add_fund/271
Step 1: Sign Up on Paystack Application
To get started with the Paystack Application, you must first sign up. If you're not already registered, follow these steps:
- Visit the Paystack website or download the Paystack app.
- Click on the "Sign Up" button.
- Provide your required details, such as name, email, and password.
- Verify your email address as per the instructions sent to your email.
Step 2: Adding Funds
- Users have the flexibility to add money to their account both before and after setting up a bill.
- If you're in the process of setting up a bill, Paystack will display a warning on your dashboard if your account balance is insufficient. In such cases, you'll be prompted to "Add Money Now."
- Alternatively, at any time, you can navigate to your Account Screen and select the "Add Money" option.
Step 3: Paying a Bill
3.1 Access the "Add Fund" Page
To pay a bill, follow these steps:
- Log in to your Paystack account.
- Go to the "Add Fund" Page, where you'll find Paystack's account details for making payments.
3.2 Making Payment
To pay a bill, follow these steps:
- Suppose the total bill amount is, for example, 1000 INR. Transfer 1000 INR to the Paystack account.
- You can make this payment from various platforms such as UPI or Net Banking.
3.3 Confirm Payment
After making the payment, you need to confirm the transaction to ensure your account gets credited correctly:
- Enter the amount you paid in the "Enter Paid Amount" textbox.
- Confirm the payment by checking the provided checkbox.
- Finally, select the "I have Paid" button to complete the process.
Step 4: Slack Notification
Upon successful payment, the Paystack system retrieves the following information from Airtable: Accountname, Amount, ID, status, and currency. This ID is then sent to Slack for further tracking and communication.
Step 5: Back Office Verification
After you confirm your payment using the "Add Fund" link, the Back Office receives a notification message on Slack. The Back Office is responsible for verifying whether the correct amount has been received in your account.
Step 6: Back Office Transaction
6.1 Redirect to Back Office UI
Following verification, the Back Office sends you a link to proceed with your transaction. Clicking on this link redirects you to the Back Office UI.
6.2 Review Fund Details
In the Back Office UI, you will see all fund details fetched from Airtable. Take a moment to review these details.
6.3 Add Money Transaction
- Confirm the transaction details.
- Select the "Add Money" Button. This action triggers the Add Money API to create a transaction on the Debit Ledger.
Step 7: Slack Confirmation
After the Back Office successfully processes your transaction, they send a confirmation notification message in the Slack channel.
Step 8: After Fund Added
At this point, your funds have been added successfully to your Paystack account. The "Insufficient Funds, Add Money Now!" warning is automatically removed from your dashboard.
Step 9: Display Balance
In your Account Screen, you can view your updated account balance, reflecting the funds you've added. In Notification, user can view their fund status.